today key : aws, vpn, client, virtual, private, network, server, client, 인증서, easy-rsa

1. 서버/클라이언트 인증서 생성
1-1. easy-rsa 다운로드 및 초기화
# git이 없는 경우에 git 설치
$ sudo yum install git

# 오픈소스 easy-rsa 프로젝트 복제 및 이동
$ git clone https://github.com/OpenVPN/easy-rsa.git
$ cd easy-rsa/easyrsa3

# PKI(공개키 기반구조) 환경 초기화
$ ./easyrsa init-pki
1-2. CA(인증 기관) 생성
자체 CA를 생성합니다.
별도의 비밀 번호 입력 없이 진행하기 위해서 nopass 옵션을 사용합니다.
Common Name에는 임의의 도메인 값으로 입력하면 됩니다.
여기에서는 zigi.ca라고 입력했습니다.
$ ./easyrsa build-ca nopass[ec2-user@ip-10-20-0-54 easyrsa3]$ ./easyrsa build-ca nopass
..+........+....+..+...+...+.......+..+..........+......+++++++++++++++++++++++++++++++++++++++*..+++++++++++++++++++++++++++++++++++++++*....+..+.+...+..+...+....+......+......+.........+............+...+...........+.+...............+...+............+.....+...+.+...+..+.............+..+....+......+...+........+.......+...+..+...+...+.......+..+.+............+.....+....+...+..+...+...+.............+............+...+......+........+...+..........+...+..+.........+...............+......+....+...+..+..........+......+...+..+...+.....................+......+...+....+...+........+...............+..........+............+..+...+..........+...+.....+....+.....+...++++++
..............+..........+......+.....+....+......+..............+......+.+.....+.+..+...+...+............+...+....+...............+..+................+..+...+.........+.+..+.......+......+.....+.........+.+..+...+....+......+...+..+.......+......+......+...+......+.....+.+...........+...+.+++++++++++++++++++++++++++++++++++++++*..+++++++++++++++++++++++++++++++++++++++*.............+......+..............+...+....+......+...+..............+.......+......+...............+.....+..................+....+..+...+..........+...............+...+..+.+.....+......+...+......+.+........+...+...+.........+...+....+...+...+........+.........+.+.........+.....+.+..+....+........+...+.......+............+.........+..+...+.+.....+..........+...+...+...+..+.........+.+..+.....................+.........+.+......+.......................+..........+...+..+...+...+.+..................++++++
You are about to be asked to enter information that will be incorporated
into your certificate request.
What you are about to enter is what is called a Distinguished Name or a DN.
There are quite a few fields but you can leave some blank
For some fields there will be a default value,
If you enter '.', the field will be left blank.
-----
Common Name (eg: your user, host, or server name) [Easy-RSA CA]:zigi.ca
Notice
------
CA creation complete. Your new CA certificate is at:
* /home/ec2-user/easy-rsa/easyrsa3/pki/ca.crt
Build-ca completed successfully.
[ec2-user@ip-10-20-0-54 easyrsa3]$
1-3. VPN 서버/클라이언트용 인증서 생성
VPN 서버용 인증서와 게인키를 생성하고,
VPN 클라이언트가 사용할 공용 클라이언트 인증서를 생성합니다.
$ ./easyrsa build-server-full server.vpn nopass
$ ./easyrsa build-server-full client.vpn nopass
[ec2-user@ip-10-20-0-54 easyrsa3]$ ./easyrsa build-server-full server.vpn nopass
...+..+.+++++++++++++++++++++++++++++++++++++++*..+..+...............+...............+.+...+..............+...+....+......+...+......+...+++++++++++++++++++++++++++++++++++++++*.....+.....+...................+.........+..+...+......+.+.....+.++++++
.....+++++++++++++++++++++++++++++++++++++++*.........+...+..+...+............+.........+.............+...+..+.+..+....+...............+...+........+++++++++++++++++++++++++++++++++++++++*..+.....+.+...+........+...+....+..+................+..+.+......+.........+.....+................+...+.....+.+.....+.........+.......+........+...+...+......+.............+.....+...+.........+...+...++++++
-----
Notice
------
Private-Key and Public-Certificate-Request files created.
Your files are:
* req: /home/ec2-user/easy-rsa/easyrsa3/pki/reqs/server.vpn.req
* key: /home/ec2-user/easy-rsa/easyrsa3/pki/private/server.vpn.key
You are about to sign the following certificate:
Requested CN: 'server.vpn'
Requested type: 'server'
Valid for: '825' days
subject=
commonName = server.vpn
Type the word 'yes' to continue, or any other input to abort.
Confirm requested details: yes
Using configuration from /home/ec2-user/easy-rsa/easyrsa3/pki/33ac4184/temp.02
Check that the request matches the signature
Signature ok
The Subject's Distinguished Name is as follows
commonName :ASN.1 12:'server.vpn'
Certificate is to be certified until Sep 5 00:34:01 2028 GMT (825 days)
Write out database with 1 new entries
Database updated
WARNING
=======
INCOMPLETE Inline file created:
* /home/ec2-user/easy-rsa/easyrsa3/pki/inline/private/server.vpn.inline
Missing TLS Key, see 'easyrsa help gen-tls'
Notice
------
Certificate created at:
* /home/ec2-user/easy-rsa/easyrsa3/pki/issued/server.vpn.crt
[ec2-user@ip-10-20-0-54 easyrsa3]$
[ec2-user@ip-10-20-0-54 easyrsa3]$ ./easyrsa build-client-full client.vpn nopass
....+.....+++++++++++++++++++++++++++++++++++++++*...........+............+...+............+...+..+...+....+.........+..+...+............+++++++++++++++++++++++++++++++++++++++*..+......+.+..............+..........+..+............+......+.+...+...+..+.......+.....+.+.................+.+......+....................+.........+....+..+.............+.....+.+..+...............+..........+...+...........+.+...+..+.......+..+...+......+.+...+..+...............+...+...+............+.+..+...+............+...+....+...++++++
.......+.+..+...+.......+..+.........+++++++++++++++++++++++++++++++++++++++*......+.+..+....+.....+.........+.+...+...+.....+.......+........+....+...+........+.......+.....+...+....+++++++++++++++++++++++++++++++++++++++*.....+....................+.......+...+..+..........+..+.........+.+...+........+...+.+..............+.......+........+....+..+.+.....+....+.........+...........+........................+.+...+...+..+.+..............+............+...+...+.......+.....+......+.......+.....+.........+.+.................+.+..+...+.+......+..+.+..+.......+...........+.........+.............+.........+.....+.+.....+..........+...+......+...+.....+.+..............+...+.......+......+...........+...+...+............+......+....+...+.....+...+....+..+..........+.....+...+......+....+...............+..+...+......+.......+...+.........+.....+..........+..+....+..............+.+..+...............+...+.+...+..................+..+.......+.....+......+.........+......+.......+......+.....+..........+..+............+.+..+.......+...+.....+...+.+.....+................+..............+.+........+.......+...+..+...+......+.+..+.+..+.........+......+....+......+.....+.........+...+.......+......+...+.....+.........+...+.............+.....+....+.....+...+.........+...+.+.....+.+...+.....+......+.......+.........+........+.+.....+.......+.........+...........+.......+...+.........+........+.+..++++++
-----
Notice
------
Private-Key and Public-Certificate-Request files created.
Your files are:
* req: /home/ec2-user/easy-rsa/easyrsa3/pki/reqs/client.vpn.req
* key: /home/ec2-user/easy-rsa/easyrsa3/pki/private/client.vpn.key
You are about to sign the following certificate:
Requested CN: 'client.vpn'
Requested type: 'client'
Valid for: '825' days
subject=
commonName = client.vpn
Type the word 'yes' to continue, or any other input to abort.
Confirm requested details: yes
Using configuration from /home/ec2-user/easy-rsa/easyrsa3/pki/39308ddc/temp.02
Check that the request matches the signature
Signature ok
The Subject's Distinguished Name is as follows
commonName :ASN.1 12:'client.vpn'
Certificate is to be certified until Sep 5 00:34:11 2028 GMT (825 days)
Write out database with 1 new entries
Database updated
WARNING
=======
INCOMPLETE Inline file created:
* /home/ec2-user/easy-rsa/easyrsa3/pki/inline/private/client.vpn.inline
Missing TLS Key, see 'easyrsa help gen-tls'
Notice
------
Certificate created at:
* /home/ec2-user/easy-rsa/easyrsa3/pki/issued/client.vpn.crt
1-4. 생성한 인증서를 복사
mkdir ~/vpn-free-certs
cp pki/ca.crt ~/vpn-free-certs/
cp pki/issued/server.vpn.crt ~/vpn-free-certs/
cp pki/private/server.vpn.key ~/vpn-free-certs/
cp pki/issued/client.vpn.crt ~/vpn-free-certs/
cp pki/private/client.vpn.key ~/vpn-free-certs/
cd ~/vpn-free-certs
2. AWS ACM에 인증서 업로드
2-1. ACM에서 인증서를 가져오기 위해서 'Import' 합니다.

2-2. 서버 인증서를 가져옵니다.
Certificate body에는 server.vpn.crt,
Certifacate private key에는 server.vpn.key,
Certificate chain에는 ca.crt 파일의 각각 인증서 영역 내용을 복사합니다.

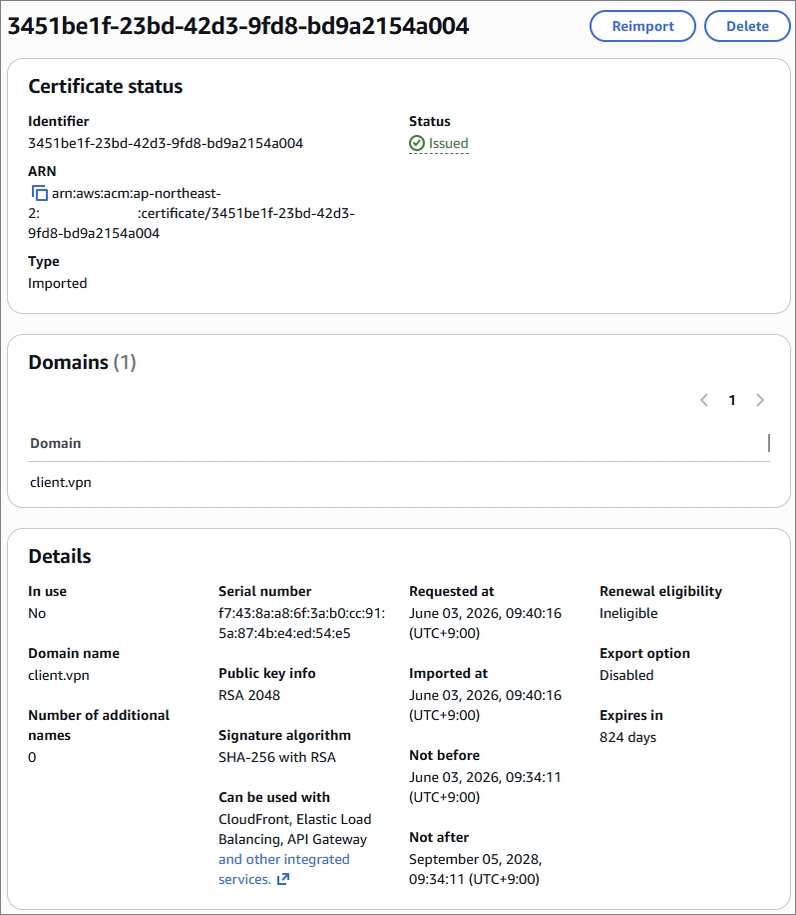
2-3. Import한 서버 인증서가 정상적으로 Status가 'Issued'인지 확인합니다.

2-4. 클라이언트도 동일하게 인증서를 가져옵니다.
3. VPC Client VPN 엔드포인트 생성
3-1. Client VPN 엔드포인트 생성
Client VPN 엔드포인트를 생성할 VPC지정합니다.

IP Address는 IPv4로 지정합니다.
VPN Client가 사용 할 CIDR을 지정합니다.
최소 22비트에서 12비트 사이로 지정합니다.

앞서 ACM에 Import한 서버 인증서를 연결하고,
Authentication 옵션에서 상호 인증(mutual authentication)을 체크합니다.
이어서, 클라이언트 인증서도 연결합니다.

Tunnel 모드는 필요한 트래픽만 VPN을 타도록, split-tunnel로 수정하였습니다.

3-2. Client VPN 엔드포인트에 연결 할 Target Network 지정
Associate target Network 메뉴를 선택하여, Target Network를 지정합니다.
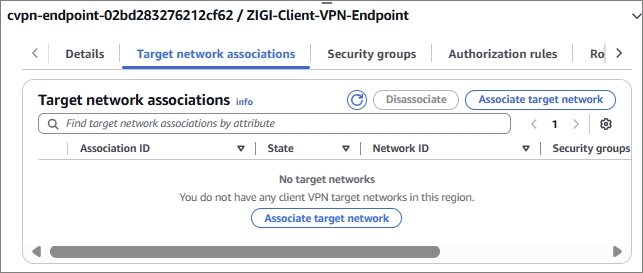
VPC 내의 Target Network의 서브넷을 선택했습니다.

3-3. Client VPN 엔드포인트 인증 규칙 추가
Add authorization rule 메뉴를 선택합니다.

VPN을 통해서 접근 가능한 목적지 네트워크 대역을 지정합니다.
그리고 Access 권한을 모든 사용자로 두었습니다.

3-4. Client VPN 엔드포인트 생성 확인
클라이언트 VPN 엔드포인트가 Available 상태까지는 10분이내 정도가 소요됩니다.
아래와 같이 정상적으로 Client VPN 엔드포인트가 활성화 상태가 되는지 확인합니다.

Client VPN엔드포인트의 라우팅 테이블에 Client VPN 엔드포인트가 연결된 VPC의 CIDR에 대한 라우팅이 들어갔는지 확인합니다.

4. Client VPN Configuration 다운 및 수정
4-1. Client configuration 설정 파일 다운
Client VPN Endpoint에서 'download client configuration' 메뉴를 선택해서,
아래와 같이 설정 파일을 로컬에 다운 받습니다.

4-2. 설정 파일 수정
텍스트 편집기로 열어 중간의 remote cvpn-endpoint-... 주소 맨 앞에 임의의 문자열을 추가합니다.

설정 파일 제일 하단에, client.vpn.crt와 client.vpn.key의 내용을 복사해서 붙여 넣습니다
# ... 기존 설정 내용 ...
<cert>
-----BEGIN CERTIFICATE-----
(client.vpn.crt 파일 내부의 -----BEGIN CERTIFICATE-----부터 끝까지 복사)
-----END CERTIFICATE-----
</cert>

<key>
-----BEGIN PRIVATE KEY-----
(client.vpn.key 파일 내부의 -----BEGIN PRIVATE KEY-----부터 끝까지 복사)
-----END PRIVATE KEY-----
</key>
5. Client VPN 을 사용할 사용자 설정
5-1. openvpn 설치 (amazon linux/RHEL 기준)
$ sudo apt update && sudo apt install openvpn -y5-2. Client VPN Configuration 파일을 사용자 환경에 복사
여기에서는 zigi-vpn.ovpn이라는 이름으로 Client VPN을 사용할 서버(PC)에 파일을 복사합니다.
5-3. Client VPN 연결 전 상태 확인 및 연결 후, 상태 확인
Client VPN 연결 전에는 loopback과 기본 인터페이스 2개가 있습니다.
[ec2-user@ip-10-20-0-14 ~]$ ip addr show
1: lo: <LOOPBACK,UP,LOWER_UP> mtu 65536 qdisc noqueue state UNKNOWN group default qlen 1000
    link/loopback 00:00:00:00:00:00 brd 00:00:00:00:00:00
    inet 127.0.0.1/8 scope host lo
       valid_lft forever preferred_lft forever
    inet6 ::1/128 scope host noprefixroute
       valid_lft forever preferred_lft forever
2: ens5: <BROADCAST,MULTICAST,UP,LOWER_UP> mtu 9001 qdisc mq state UP group default qlen 1000
    link/ether 02:1e:08:e2:77:69 brd ff:ff:ff:ff:ff:ff
    altname enp0s5
    altname eni-099e1d86ab9b3c781
    altname device-number-0.0
    inet 10.20.0.14/26 metric 512 brd 10.20.0.63 scope global dynamic ens5
       valid_lft 3156sec preferred_lft 3156sec
    inet6 fe80::1e:8ff:fee2:7769/64 scope link proto kernel_ll
       valid_lft forever preferred_lft forever
[ec2-user@ip-10-20-0-14 ~]$
Client VPN Configuration 파일(zigi-vpn.ovpn)을 이용해서 openvpn으로 Client VPN에 연결합니다.
$ sudo openvpn --config ~/zigi-vpn.ovpn --daemon
Client VPN 연결 후, 인터페이스를 보면 제일 하단에 tunnel 인터페이스가 생긴 것을 볼 수 있습니다.
[ec2-user@ip-10-20-0-14 ~]$ sudo openvpn --config ~/zigi-vpn.ovpn --daemon
[ec2-user@ip-10-20-0-14 ~]$
[ec2-user@ip-10-20-0-14 ~]$ ip addr show
1: lo: <LOOPBACK,UP,LOWER_UP> mtu 65536 qdisc noqueue state UNKNOWN group default qlen 1000
    link/loopback 00:00:00:00:00:00 brd 00:00:00:00:00:00
    inet 127.0.0.1/8 scope host lo
       valid_lft forever preferred_lft forever
    inet6 ::1/128 scope host noprefixroute
       valid_lft forever preferred_lft forever
2: ens5: <BROADCAST,MULTICAST,UP,LOWER_UP> mtu 9001 qdisc mq state UP group default qlen 1000
    link/ether 02:1e:08:e2:77:69 brd ff:ff:ff:ff:ff:ff
    altname enp0s5
    altname eni-099e1d86ab9b3c781
    altname device-number-0.0
    inet 10.20.0.14/26 metric 512 brd 10.20.0.63 scope global dynamic ens5
       valid_lft 3133sec preferred_lft 3133sec
    inet6 fe80::1e:8ff:fee2:7769/64 scope link proto kernel_ll
       valid_lft forever preferred_lft forever
3: tun0: <POINTOPOINT,MULTICAST,NOARP,UP,LOWER_UP> mtu 1500 qdisc fq_codel state UNKNOWN group default qlen 500
    link/none
    inet 10.100.0.34/27 scope global tun0
       valid_lft forever preferred_lft forever
    inet6 fe80::b69e:bf26:eab:5274/64 scope link stable-privacy proto kernel_ll
       valid_lft forever preferred_lft forever
[ec2-user@ip-10-20-0-14 ~]$
라우팅 테이블을 보면, Client VPN Endpoint에 연결된 VPC의 IP 대역인
10.10.0.0/22와 100.64.0.0/21 에 대한 네트워크가 tun0 인터페이스로 라우팅이 잡힌 것을 볼 수 있습니다.
그리고, Client VPN Endpoint에 있는 VPC에 있는 서버(10.10.0.23)로 Ping 테스트를 해보면 정상적으로 통신이 되는 것을 볼 수 있습니다.
[ec2-user@ip-10-20-0-14 ~]$ ip route
default via 10.20.0.1 dev ens5 proto dhcp src 10.20.0.14 metric 512
10.10.0.0/22 via 10.100.0.33 dev tun0
10.20.0.0/26 dev ens5 proto kernel scope link src 10.20.0.14 metric 512
10.20.0.1 dev ens5 proto dhcp scope link src 10.20.0.14 metric 512
10.20.0.2 dev ens5 proto dhcp scope link src 10.20.0.14 metric 512
10.100.0.32/27 dev tun0 proto kernel scope link src 10.100.0.34
100.64.0.0/21 via 10.100.0.33 dev tun0
[ec2-user@ip-10-20-0-14 ~]$
[ec2-user@ip-10-20-0-14 ~]$ ping 10.10.0.23 -c 1
PING 10.10.0.23 (10.10.0.23) 56(84) bytes of data.
64 bytes from 10.10.0.23: icmp_seq=1 ttl=126 time=1.58 ms

--- 10.10.0.23 ping statistics ---
1 packets transmitted, 1 received, 0% packet loss, time 0ms
rtt min/avg/max/mdev = 1.582/1.582/1.582/0.000 ms
[ec2-user@ip-10-20-0-14 ~]$
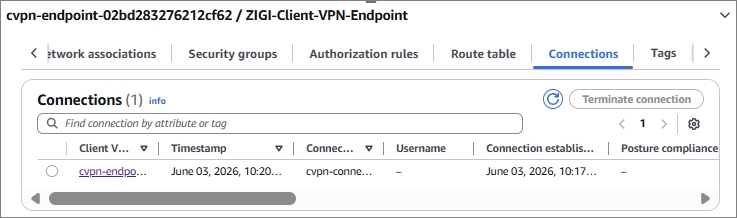
AWS VPC Client VPN Endpoint에서 'Connections' 정보를 보면,
현재 연결된 Client VPN의 사용자 정보를 볼 수 있습니다.
6. Client VPN 프로그램 이용하기
6-1. Client VPN 프로그램 다운
Client VPN Endpoint에서 보면 'Client downloads' 메뉴에서 각 운영체제와 CPU 아키텍처에 따른 설치 프로그램을 받을 수 있씁니다.

6-2. Client VPN 설치
다운받은 Client VPN을 설치합니다.
본 포스팅에서는 Windows 환경에서 다운 받아서 설치합니다.

6-3. Client VPN 프로필 추가
앞서 만든 Client VPN Endpoint의 Configuration 파일(ovpn)을 프로필에 등록합니다.

6-4. Client VPN 연결
프로필을 선택해서, 연결 버튼을 눌러서 Client VPN에 연결을 시도합니다.

정상적으로 연결되면 아래와 같이 연결된 것을 볼 수 있습니다.

연결이 완료되면 아래와 같이 Tunnel 인터페이스가 생긴 것을 볼 수 있습니다.

Client VPN Endpoint가 연결된 VPC의 서버(10.10.0.23)와 통신이 정상적으로 되는 것을 볼 수 있습니다.


